Wednesday, 8 July 2015

SQL Server Integration Services SSIS FTP Task for Data Exchange

Problem
An FTP (File Transfer Protocol) server is often used for data exchanges in many data integration scenarios. SSIS includes an FTP task to download and upload data files to and from an FTP location, but how does this work and how can we configure it for data file downloads and uploads?
Solution
When data integration system or ETL processes can't connect directly to the data source system, an FTP server can be used as a temporary storage location for data exchange. Source systems can upload data to an FTP server and then the data integration system can download the data from the FTP server and import the data into the database.
SSIS being one of the leading ETL tools in the market includes an FTP task for working with an FTP server.  Downloading data files from an FTP server to the local machine and other tasks can be used to import the data from the locally downloaded data files to the database/data warehouse. Not only does the FTP Task allow downloading of the data files, but there are a host of other operations that can be performed with this task as mentioned below:

Operation
Description
Send filesUsed for uploading files from the local machine to the FTP server 
Receive files Used for downloading files from the FTP server to the local machine 
Create local directory Used to create a folder on the local machine 
Create remote directory Used to creates a folder on the FTP server 
Remove local directory Used to delete a folder on the local machine 
Remove remote directory Used to delete a folder on the FTP server 
Delete local files Used to delete a file on the local machine 
Delete remote files Used to delete a file on the FTP server 

Connecting to an FTP Server Using Windows Explorer

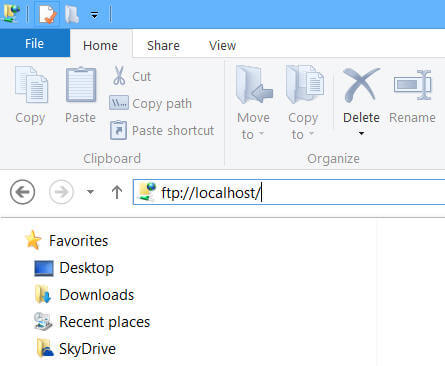
There are different ways to connect to an FTP Server for data verification and one of the easiest ways is to use Windows Explorer.  Just specify the FTP Server name with FTP protocol as shown below and hit <Enter>.
There are different ways to connect to FTP Server for data verification
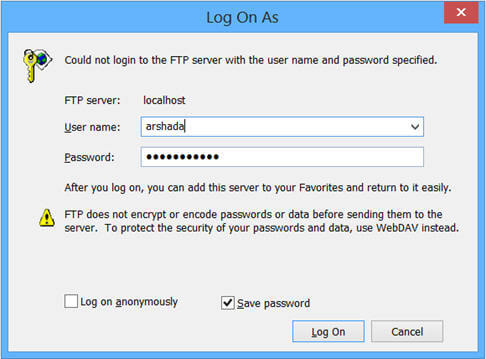
This will bring up a screen as shown below. Here we need to specify the credentials to connect to the FTP Server or choose to log on anonymously if the FTP Server allows anonymous access.
specify the FTP Server name with FTP protocol
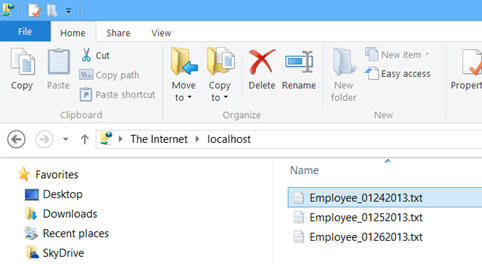
Next click on the Log On button to log onto the specified FTP Server with the specified credentials. Based on permissions, it will display folders and files similarly to what's shown below:
click on Log On button

Using the FTP Task in an SSIS Package

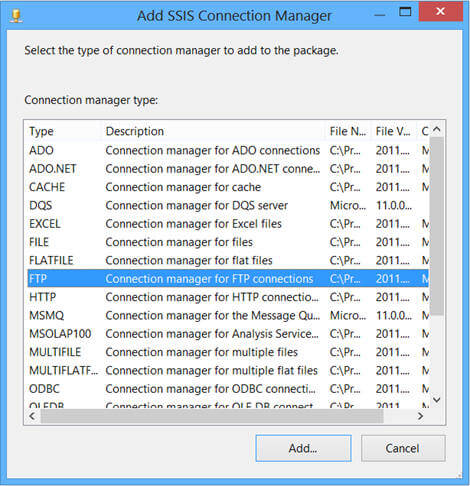
In order to connect to an FTP Server, we first need to create an FTP connection manager which encapsulates information needed to connect to the FTP Server and the FTP task that uses that information at run time to connect to the server. In order to create a FTP connection manager create a new package and right click on the Connection Managers pane on the bottom and then select FTP as the connection manager type from the dialog box as shown below:
right click on the Connection Managers pane on the bottom and then select FTP as connection manager type f
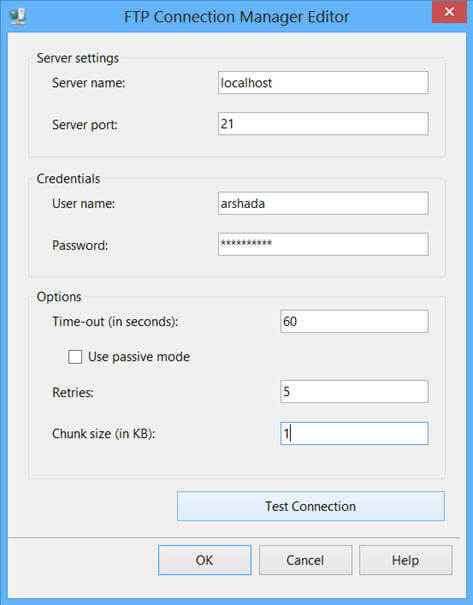
Clicking on the Add button on the above dialog box will bring up an FTP Connection Manager Editor to specify the different information which will be used to connect to the FTP Server. For example, the FTP Server name, port, credentials to connect to the FTP Server, etc...
Clicking on Add button on the above dialog box will bring up a FTP Connection Manager Editor
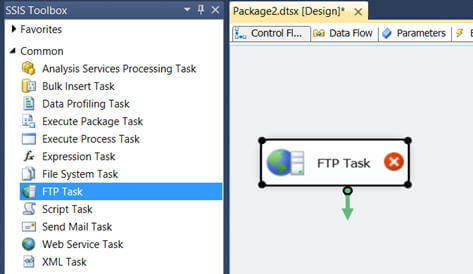
Now you can drag an FTP Task from the SSIS Toolbox to the control flow, which will look similar to this:
drag the FTP task from the SSIS Toolbox to the control panel
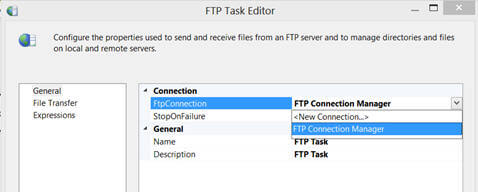
Double click on the FTP task to change its properties in the Editor. The editor has 3 pages.  On the General page we need to select the FTP connection manager that we created above for connecting to the FTP Server and then specify an appropriate name and description for the component as shown below:
Double click on the FTP task to change its properties in the Editor
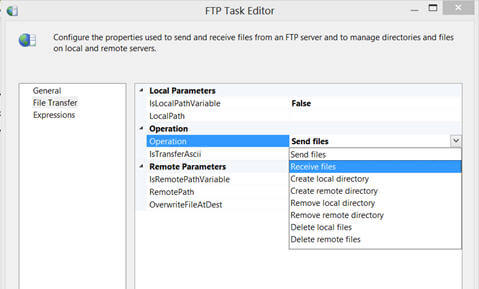
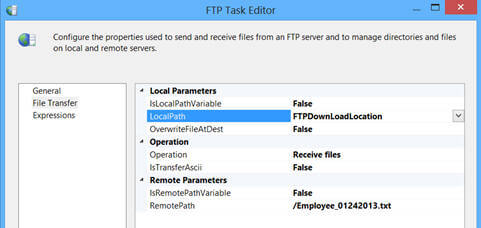
On the FTP Transfer page, we first need to select the operation that we want to perform (more about these different operations can be found in the beginning of this tip) with this FTP task based on the Local Parameters and Remote Parameters options will appear or disappear. For example, when we select "Receive files" as the operation type then both Local Parameters and Remote Parameters options will appear, but if I select the "Create remote directory" option then only the Remote Parameters option will appear.
the FTP Transfer page of FTP Task Editor
For this example I want to download a specific file from the FTP Server so I will chose "Receive files" as the operation type and then specify the remote parameters like location and name of the file to be downloaded and the local parameters like local machine folder where the downloaded file will be saved. Here, I can either specify hard-coded values for these parameters or the values can come from SSIS package variables making this process more dynamic.
chose "Receive files" as the operation type
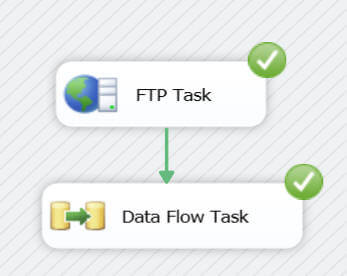
As you might have noticed, we can select only one operation type for each FTP task and if we want to perform multiple operations we need to use multiple FTP tasks, one for each operation. Now if I execute the package we can see the file from the FTP Server getting downloaded and written to the folder that we specified. After the file has been downloaded I can then use a data flow task to load data from the locally downloaded file to the database.
the values can come from SSIS package variables

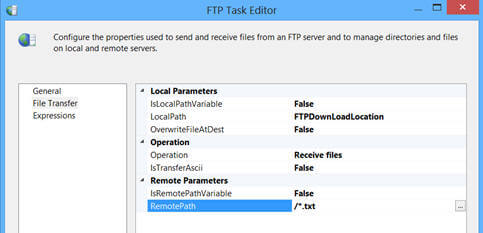
Downloading Multiple Files using a Wild Card Character

In the above example, I simply downloaded one file from the FTP Server to the local machine. But what if I want to download or upload all the text files or all the XML files in one go. Well in that scenario, we can use a wild card character. For example, as you can see below I want to download all text files from the specified FTP Server location to the local machine and hence I specified "*.txt" for the file name.
Downloading multiple files with wild card character
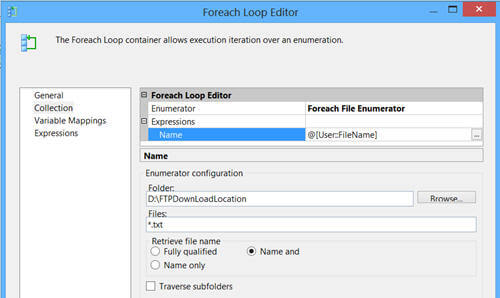
Now the above specified wild card character will download all the text files to the local machine from the FTP Server. To load each of these files to the database I can use a ForEach Loop container in SSIS as shown below.
the above specified wild card character will download all the text files to the local machine from the FTP Server
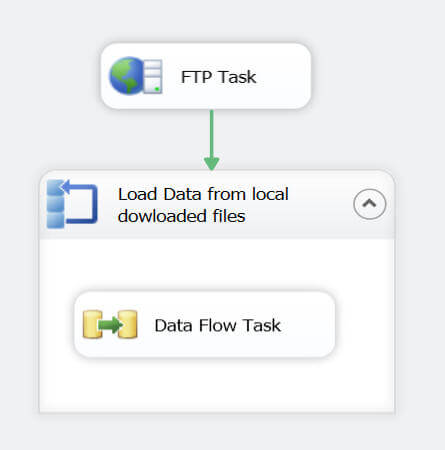
We can use the ForEach Loop Container with a ForEach File Enumerator and process all the data files from the locally downloaded folder; in other words, process each data file one at a time in a loop.
use ForEach Loop Container with ForEach File Enumerator and process all the data files
The FTP Task in SSIS does not support SFTP (Secured FTP), but there is a task available at codeplex which can be used for this scenario. 

Tuesday, 23 June 2015

Generic in C#


C# program that describes generic class

using System;

class Test<T>
{
    T _value;

    public Test(T t)
    {
 // The field has the same type as the parameter.
 this._value = t;
    }

    public void Write()
    {
 Console.WriteLine(this._value);
    }
}

class Program
{
    static void Main()
    {
 // Use the generic type Test with an int type parameter.
 Test<int> test1 = new Test<int>(5);
 // Call the Write method.
 test1.Write();

 // Use the generic type Test with a string type parameter.
 Test<string> test2 = new Test<string>("cat");
 test2.Write();
    }
}

Output

5
cat

Thursday, 21 May 2015

Import MS Excel data to SQL Server table using C#

If you already have data in MS Excel file, and want to migrate your MS Excel data to SQL Server table, follow the below steps:

Step 1: Let’s take an example to import data to SQL Server table. I am going to import student information data from an MS Excel sheet to the tStudent SQL table:

Step 2: Now design a tStudent table in SQL Server

CREATE TABLE
(
STUDENT VARCHAR(64),
ROLLNO VARCHAR(16),
COURSE VARCHAR(32),
)
Your MS Excel sheet and SQL table are ready, now it’s time to write C# code to import the Excel sheet into the tStudent table.

Step 3: Add these two namespaces in your class file:
USING SYSTEM.DATA.OLEDB;
USING SYSTEM.DATA.SQLCLIENT;
 
Step 4: Add below method in your class file, you can call this method from any other class and pass the Excel file path:
public void importdatafromexcel(string excelfilepath)
{
    //declare variables - edit these based on your particular situation
    string ssqltable = "tdatamigrationtable";
    // make sure your sheet name is correct, here sheet name is sheet1, so you can change your sheet name if have
    different
    string myexceldataquery = "select student,rollno,course from [sheet1$]";
    try
    {
        //create our connection strings
        string sexcelconnectionstring = @"provider=microsoft.jet.oledb.4.0;data source=" + excelfilepath +
        ";extended properties=" + "\"excel 8.0;hdr=yes;\"";
        string ssqlconnectionstring = "server=mydatabaseservername;user
        id=dbuserid;password=dbuserpassword;database=databasename;connection reset=false";
        //execute a query to erase any previous data from our destination table
        string sclearsql = "delete from " + ssqltable;
        sqlconnection sqlconn = new sqlconnection(ssqlconnectionstring);
        sqlcommand sqlcmd = new sqlcommand(sclearsql, sqlconn);
        sqlconn.open();
        sqlcmd.executenonquery();
        sqlconn.close();
        //series of commands to bulk copy data from the excel file into our sql table
        oledbconnection oledbconn = new oledbconnection(sexcelconnectionstring);
        oledbcommand oledbcmd = new oledbcommand(myexceldataquery, oledbconn);
        oledbconn.open();
        oledbdatareader dr = oledbcmd.executereader();
        sqlbulkcopy bulkcopy = new sqlbulkcopy(ssqlconnectionstring);
        bulkcopy.destinationtablename = ssqltable;
        while (dr.read())
        {
            bulkcopy.writetoserver(dr);
        }
     
        oledbconn.close();
    }
    catch (exception ex)
    {
        //handle exception
    }
}
 
In the above function you have to pass the MS Excel file path as a parameter. If you want to import your data by providing the client access to select the Excel file and import, then you might have to use the ASP.NET File control and upload the Excel file on the server in some temp folder, then use the file path of the uploaded Excel file and pass the path in the above function. Once data import is complete then you can delete the temporary file.
The above method first deletes the existing data from the destination table, then imports the Excel data into the same table.

Wednesday, 20 May 2015

Console application using C# to Convert Excel file data into xml file with adding own tag element like attributes

using System;
using System.Collections.Generic;
using System.Linq;
using System.Web;
using System.Web;
using System.Data;
using System.Xml;


namespace ConvertExceltoXMLConsoleApplication
{
    class Program
    {
        static void Main(string[] args)
        {

            string Exfilepath = @"D:\Verification.xlsx";
            DataTable dt = new DataTable();
            DataRow dr = null;
            string fetch = null;
            System.Data.OleDb.OleDbConnection MyConnection = null;
            System.Data.DataSet DtSet = null;
            System.Data.OleDb.OleDbDataAdapter MyCommand = null;
            // MyConnection = new System.Data.OleDb.OleDbConnection("provider=Microsoft.Jet.OLEDB.4.0; Data Source='" + Exfilepath + "';Extended Properties=Excel 8.0;");

            //If you MS Excel 2007 then use below lin instead of above line
            MyConnection = new System.Data.OleDb.OleDbConnection("Provider=Microsoft.ACE.OLEDB.12.0;Data Source='" + Exfilepath + "';Extended Properties=Excel 12.0;");

            MyCommand = new System.Data.OleDb.OleDbDataAdapter("select ApplicantFirstName,VoterId,ExternalApplicationId,DateOfBirth,Gender,Address1Line from [VoterID$]", MyConnection);
            DtSet = new System.Data.DataSet();
            MyCommand.Fill(DtSet, "[VoterID$]");


            XmlDocument xmlDoc = new XmlDocument();
            XmlNode docNode = xmlDoc.CreateXmlDeclaration("1.0", "UTF-8", null);
            xmlDoc.AppendChild(docNode);
            XmlNode rootNode = xmlDoc.CreateElement("DCRequest");
            XmlAttribute attribute1 = xmlDoc.CreateAttribute("xmlns");
          
            attribute1.Value = "http://swapnilmahangare.blogspot.in";
            rootNode.Attributes.Append(attribute1);
            xmlDoc.AppendChild(rootNode);

            XmlNode AuthenticationNode = xmlDoc.CreateElement("Authentication");
            XmlAttribute AuthenticationAttribute = xmlDoc.CreateAttribute("type");
            AuthenticationAttribute.Value = "OnDemand";
            AuthenticationNode.Attributes.Append(AuthenticationAttribute);
            rootNode.AppendChild(AuthenticationNode);

            XmlNode UserIdNode = xmlDoc.CreateElement("UserId");
            UserIdNode.AppendChild(xmlDoc.CreateTextNode("swapnil"));
            AuthenticationNode.AppendChild(UserIdNode);
            XmlNode PasswordNode = xmlDoc.CreateElement("Password");
            PasswordNode.AppendChild(xmlDoc.CreateTextNode("*******"));
            AuthenticationNode.AppendChild(PasswordNode);

            XmlNode RequestInfoNode = xmlDoc.CreateElement("RequestInfo");
            rootNode.AppendChild(RequestInfoNode);

            XmlNode SolutionSetNode = xmlDoc.CreateElement("SolutionSetId");
            SolutionSetNode.AppendChild(xmlDoc.CreateTextNode("665"));
            RequestInfoNode.AppendChild(SolutionSetNode);
            XmlNode SolutionSetVersionNode = xmlDoc.CreateElement("SolutionSetVersion");
            SolutionSetVersionNode.AppendChild(xmlDoc.CreateTextNode("V2"));
            RequestInfoNode.AppendChild(SolutionSetVersionNode);
            XmlNode ExecutionNode = xmlDoc.CreateElement("ExecutionMode");
            ExecutionNode.AppendChild(xmlDoc.CreateTextNode("NewWithContext"));
            RequestInfoNode.AppendChild(ExecutionNode);


            DataTable dt1 = DtSet.Tables[0];
            for (int i = 0; i < dt1.Rows.Count; i++)
            {

                if (!string.IsNullOrWhiteSpace(dt1.Rows[i][1].ToString()))
                {
                    XmlNode FieldsNode = xmlDoc.CreateElement("Fields");
                    rootNode.AppendChild(FieldsNode);
                    XmlNode userNode = xmlDoc.CreateElement("Field");
                    XmlAttribute attribute = xmlDoc.CreateAttribute("Key");
                    attribute.Value = "ApplicantFirstName";
                    userNode.Attributes.Append(attribute);
                    userNode.InnerText = dt1.Rows[i][0].ToString();
                    FieldsNode.AppendChild(userNode);

                    userNode = xmlDoc.CreateElement("Field");
                    attribute = xmlDoc.CreateAttribute("Key");
                    attribute.Value = "VoterId";
                    userNode.Attributes.Append(attribute);
                    userNode.InnerText = dt1.Rows[i][1].ToString();
                    FieldsNode.AppendChild(userNode);


                    userNode = xmlDoc.CreateElement("Field");
                    attribute = xmlDoc.CreateAttribute("Key");
                    attribute.Value = "ExternalApplicationId";
                    userNode.Attributes.Append(attribute);
                    userNode.InnerText = dt1.Rows[i][2].ToString();
                    FieldsNode.AppendChild(userNode);

                    userNode = xmlDoc.CreateElement("Field");
                    attribute = xmlDoc.CreateAttribute("Key");
                    attribute.Value = "DateOfBirth";
                    userNode.Attributes.Append(attribute);
                    userNode.InnerText = dt1.Rows[i][3].ToString();
                    FieldsNode.AppendChild(userNode);

                    userNode = xmlDoc.CreateElement("Field");
                    attribute = xmlDoc.CreateAttribute("Key");
                    attribute.Value = "Gender";
                    userNode.Attributes.Append(attribute);
                    userNode.InnerText = dt1.Rows[i][4].ToString();
                    FieldsNode.AppendChild(userNode);

                    userNode = xmlDoc.CreateElement("Field");
                    attribute = xmlDoc.CreateAttribute("Key");
                    attribute.Value = "Address1Line";
                    userNode.Attributes.Append(attribute);
                    userNode.InnerText = dt1.Rows[i][5].ToString();
                    FieldsNode.AppendChild(userNode);
                }
            }

            xmlDoc.Save("D:\\Verification.xml");

     
        }
    }
}


Output:-

 <?xml version="1.0" encoding="UTF-8" ?>
 <DCRequest xmlns="http://swapnilmahangare.blogspot.in">
 <Authentication type="OnDemand">
  <UserId>swapnil</UserId>
  <Password>*******</Password>
  </Authentication>
 <RequestInfo>
  <SolutionSetId>33</SolutionSetId>
  <SolutionSetVersion>rr</SolutionSetVersion>
  <ExecutionMode>NewWithContext</ExecutionMode>
  </RequestInfo>
 <Fields>
  <Field Key="ApplicantFirstName">REJITHA M</Field>
  <Field Key="VoterId">232323</Field>
  <Field Key="ExternalApplicationId">2323</Field>
  <Field Key="DateOfBirth">08.10.1991</Field>
  <Field Key="Gender">FEMALE</Field>
  <Field Key="Address1Line">rrrrrrr</Field>
  </Fields>
 <Fields>
  <Field Key="ApplicantFirstName">RAKESH T</Field>
  <Field Key="VoterId">343434</Field>
  <Field Key="ExternalApplicationId">55555</Field>
  <Field Key="DateOfBirth">04.07.1991</Field>
  <Field Key="Gender">MALE</Field>
  <Field Key="Address1Line">gggggg</Field>
  </Fields>
</DCRequest>

Monday, 18 May 2015

Could not find default endpoint element that references contract ‘Your Service’ in the ServiceModel client configuration section.

When I consume the WCF in a class library project by adding the  service reference , I got the following  exception message :
Your search - Could not find default endpoint element that references contract 'yourService' in the ServiceModel client configuration section. This might be because no configuration file was found for your application, or because no endpoint element matching this contract could be found in the client element. - did not match any documents.

In order to solve this , you will need copy the System.ServiceModel section of the generated app.config file to the executing assembly project’s .config file (web.config for web application project, app.config for windows or console project) . Then it run like a charm. This is because the app.config file in the class library project  is not used by the WCF ,instead the executing assembly project’s .config file will be used.